Hi all,
this will be the last post possibly for this year. Reason is that christmas and the days in between and new years eve are aproaching very fast .It is a festive season with lots of joy and meeting friends.
I want to thank you all for reading through this blog in the last couple of months and I will of course continue this in 2013.
At this stage I want to wish all of you a happy and peaceful christmas, lots of joy and a fantastic start into 2013 !
Cheers
HaJo
Sonntag, 23. Dezember 2012
Freitag, 14. Dezember 2012
Flames of War - (Tutorial) - From Comrade to Comrade (Soviet Objective Marker) -Part 2
Hi folks,
finally back on track with this soviet marker. If you have missed out the first part you will find it here:
http://citadelofwar.blogspot.ie/2012/12/flames-of-war-tutorial-from-comrade-to.html
What happened by now ?
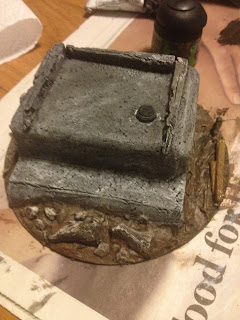
First of all I watered down (50-50 split) PVA glue with water and found at my place some sand for the base. This time a bit more granulated one. This sand I drenched into my mixture and simple spackeled it on my base. It took a night to finally dry appropiate for later usage.
Afterwards I painted the whole statue in undercoat black by Citadel GW and drybrushed it later on with a simple skullwhite (also Citadel / GW colour). For colouring the sand I used a bit of a mixture of the rest colour that I did not use on and around my brush.
The matchstick parts got a heavy yellow on it and not being dry also parts of brown. Now awaiting till everything is dry enough and then simply will add a piece of wire or similar around the "wood" parts.


finally back on track with this soviet marker. If you have missed out the first part you will find it here:
http://citadelofwar.blogspot.ie/2012/12/flames-of-war-tutorial-from-comrade-to.html
What happened by now ?
First of all I watered down (50-50 split) PVA glue with water and found at my place some sand for the base. This time a bit more granulated one. This sand I drenched into my mixture and simple spackeled it on my base. It took a night to finally dry appropiate for later usage.
Afterwards I painted the whole statue in undercoat black by Citadel GW and drybrushed it later on with a simple skullwhite (also Citadel / GW colour). For colouring the sand I used a bit of a mixture of the rest colour that I did not use on and around my brush.
The matchstick parts got a heavy yellow on it and not being dry also parts of brown. Now awaiting till everything is dry enough and then simply will add a piece of wire or similar around the "wood" parts.


Mittwoch, 12. Dezember 2012
Short wrap up of 2012 - and what the future will bring in 2013
Before finishing up the "Comrade to Comrade" tutorial I first want to thank you all for participating in this blog, Reading it and hopefully find something useful in here for you.
2012 for me was quite an exciting year. First of all I started completely as a newbie into wargaming with all the tries and errors involved. My first miniatures were by Warhammer "High elves" from the "Island of Blood" set which I bought first. Not knowing what would evolve out of this.
The first steps for me were to paint that bloody elves over and over again as improving all the time. By now I still have plenty of these box miniatures left to paint and currently am thinking about of selling them of. Developement or not ?
After trying out plenty of stuff during my first holidays of the year I changed a bit more into that terrain building stuff. The first steps are always the most difficult to learn. Wrappings in cardboard, Styrodur that melts with paint spray are just only a few examples of what happens when you are not knowing or experienced enough.
Considering now and that I am still taking on more difficult stuff all way long I am pleased on what I now get out of my mind and to the board. I was extremely happy when someone told me during our Rangers experience here in Cork that the ruined house I did to him looked like being bought from a normal reseller. That really was a boost again to get such a great feedback
This blog, since opening its virtual doors here, now has more than 5000 visitors already by approx 80 Posts which makes approx 62 Readers on each contributed article. Thank you all for that !
What did I do (and I guess some of you have asked yourself if there is some real life back in me after all the october and november blogging stuff....with heavy terrain building):
On the painting side:
I would count approx 500 Figures (including vehicles , tanks, miniatures etc...) to what I have painted up since april 2012. This includes Flames of War, Warhammer Fantasy, Warhammer 40k, Napoleonics and some freelancing models normally used in other games, but which I liked so much from the pictures of the webpages they appeared on that I had to get my hands on them.
Events:
I only attended one event which was the Rangers Programm event a couple of weeks back and which I organised. To the rest I could not make it. Mostly personal stuff regarding a serious health situation with my family back in Germany
This Blog:
80 Postings and there are two sister blogs as well (one for the napoleonics and one for the warhammer world). So the overall amount of postings is well beyond 100 pieces and the number in total of visitors exceeds 6000 people. Wow again.
New friends:
Might sound a bit strange to you while reading this, but I am also talking to real ppl , meet real ppl and guess what ... also email real ppl. New friends does include you ! You who is reading this blog on a regular basis (hi!) or discovers it new ... or simply mailed me comments etc.. Thank you again !
And now for the announcements of 2013:
As you might have noticed it got a bit more quite here at present. Reason were my holidays as well as the preperations I am currently doing on some new ideas.
January 2013 :
The year will start with the finishing of my preperations. This month also will see on this blog a modular tileset of terrain. Currently I visited my DIY shop and ordered the tiles. This modular terrain set will enable you (and me) to play small scale games by 2 foot by 2 foot (and will be extendable to the final size of 4 by 6 foot)
This will probably be a feature I will along through the whole year to finish up a complete 4 by 6 foot table which is totally modular. Inspiration I got while watching a couple of youtube videos on terrain building. So it will be one tile per month appearing on this blog including of course a WIP, Tutorial on what to do, Materials used etc...As each tile will be 1 by 1 foot there is plenty of work to be done to finish it up. So hope to see you here again !
Cheers ! A happy christmas to all of you and yours !
HaJo
Montag, 10. Dezember 2012
Flames of War - (Tutorial) - From Comrade to Comrade (Soviet Objective Marker) -Part 1
Hi all !
This seems to get my favourite objective marker. After unboxing the PSC Soviets in Summer uniform and assembling them the box left me with quite some more Kommisars left to build up and which I normally can not use somethere else at present.
After building objective markers back in october I figured out that I do not have one for the soviets and that needed to change.
Materials used:
- Leftover Kommisar from PSC sprue
- Beermatt as the base (cut to fit a large base)
- 1 matchstick
- wire (used in the follow up post)
- old doorstopper I could not use any longer
Steps:
As this gets a statue it is a bit more on higher ground. This will be our doorstopper. The two used metal pieces will be our steps to highlight the statue.
Glue them on the base with the larger one going first. Be careful, superglue needed here. The smaller one fits perfect in the middle again and with that we attach also the rubberthing of the doorstopper.
Assemble the "Kommisar" as this will get our Comrade Stalin and glue him on top of the rubber.
Next step is to cut four even pieces from the matchstick as a surrounding part as a statue will be protected by some wire element.


Sonntag, 9. Dezember 2012
Flames of War - unboxing - Plastic Soldier Company Russians in Summer uniform vs Battlefront Strelkovy Platoon
Hei all,
its been a while since my last post, but as life goes on and I still had to many holidays left at company I considered using the time abroad.
From my travels I grapped up a box of PSC "Russians in Summeruniform" which I now call my own. After considering for a while how Battlefront will go on I guess it will be time for them to focus more on the eastern front in upcoming releases as the western one seem to be quite sucked out now.
PSC Box comes along with 5 sprues of plastic soldiers. Each sprue contains one Kommissar and different other soldiers as well as a female one included. A plus here against Battlefront is that approx half of the sprue contains parts which you have to glue together. Why a plus ? The answer is easy enough as you get a bit more variety against the static plastic or metal castings of Battlefront.
PSC - Battlefront 1:0
What PSC does not provide are bases which normally are included in the Battlefront products. You either have to buy them seperatly or build them yourself as I did with a beermatt. At least the last method does not cost anything at all. Otherwhise you need to go and buy some bases again.
PSC - Battlefront 1:1
Regarding the box itself I will get approx 139 figures with the PSC Box. Thats quite much ! Considering that the strelkovy platoons always go for manpower this whole box brings you up to more than 3 times the amount of soldiers which you will get with a Battlefront blister (compared to Battlefront SU702) or have 7 figures less then the Battlefront Box "Udarny Strelkovy Batalon (SBX02)". This also raises the question of costs. Regarding the PSC Box I paid 21,12 Euro and compared to SU702 (one blister approx 14,28 Euro) and SBX02 (one box approx 50,40 Euro) I safed a lot of money. I could get more than double the amount of soldiers if I would spend in PSC then to the SBX02 box.
PSC - Battlefront 2:1
Talking about the contents. The blisters of Battlefront use quite old moulds and often you have to rework figures so that they at least look human again. The sprues of PSC do not even have a visible mould line to me which safes my time and my nerves.
PSC - Battlefront 3:1
Contents and service .....you all know that if you buy a blister of Battlefront there rarely is any hint on how to paint the models you bought or any sort of assembly guide which might get you into troubles if you go along for more complex armour or guns. PSC box on the back provides you with a hint on what colours to use. As Battlefront also uses Vallejo the guys of PSC have a Vallejo Colour code on it. For the sake to comparision they also placed two pictures of finished models on the back side. A folded paper in the box explains how to assemble the contents. Thats handy and still leaves you with options.
PSC - Battlefront 4:1
Summary:
I normally go with Battlefront blisters and miniatures but this experiment will leave my soviet army with PSC. Measurements are equal to the Battlefront miniatures so that no one will really find out what is what except for the above mentioned parts regarding the mould and the weight of a base. I hope to get my hands then on some tanks and anti-tank guns soon as this experiment really turned out good for me. I got three platoons of strelkovy to field including a command for more than half of the prize I would have paid with Battlefront.
Also PSC provides much more information on e.g. painting the miniatures which safes a lot of time on your own research. We want to play Battlefront and not to research on what to paint !
Clear winner by points: Plastic Soldier Company
its been a while since my last post, but as life goes on and I still had to many holidays left at company I considered using the time abroad.
From my travels I grapped up a box of PSC "Russians in Summeruniform" which I now call my own. After considering for a while how Battlefront will go on I guess it will be time for them to focus more on the eastern front in upcoming releases as the western one seem to be quite sucked out now.
PSC Box comes along with 5 sprues of plastic soldiers. Each sprue contains one Kommissar and different other soldiers as well as a female one included. A plus here against Battlefront is that approx half of the sprue contains parts which you have to glue together. Why a plus ? The answer is easy enough as you get a bit more variety against the static plastic or metal castings of Battlefront.
PSC - Battlefront 1:0
What PSC does not provide are bases which normally are included in the Battlefront products. You either have to buy them seperatly or build them yourself as I did with a beermatt. At least the last method does not cost anything at all. Otherwhise you need to go and buy some bases again.
PSC - Battlefront 1:1
Regarding the box itself I will get approx 139 figures with the PSC Box. Thats quite much ! Considering that the strelkovy platoons always go for manpower this whole box brings you up to more than 3 times the amount of soldiers which you will get with a Battlefront blister (compared to Battlefront SU702) or have 7 figures less then the Battlefront Box "Udarny Strelkovy Batalon (SBX02)". This also raises the question of costs. Regarding the PSC Box I paid 21,12 Euro and compared to SU702 (one blister approx 14,28 Euro) and SBX02 (one box approx 50,40 Euro) I safed a lot of money. I could get more than double the amount of soldiers if I would spend in PSC then to the SBX02 box.
PSC - Battlefront 2:1
Talking about the contents. The blisters of Battlefront use quite old moulds and often you have to rework figures so that they at least look human again. The sprues of PSC do not even have a visible mould line to me which safes my time and my nerves.
PSC - Battlefront 3:1
Contents and service .....you all know that if you buy a blister of Battlefront there rarely is any hint on how to paint the models you bought or any sort of assembly guide which might get you into troubles if you go along for more complex armour or guns. PSC box on the back provides you with a hint on what colours to use. As Battlefront also uses Vallejo the guys of PSC have a Vallejo Colour code on it. For the sake to comparision they also placed two pictures of finished models on the back side. A folded paper in the box explains how to assemble the contents. Thats handy and still leaves you with options.
PSC - Battlefront 4:1
I normally go with Battlefront blisters and miniatures but this experiment will leave my soviet army with PSC. Measurements are equal to the Battlefront miniatures so that no one will really find out what is what except for the above mentioned parts regarding the mould and the weight of a base. I hope to get my hands then on some tanks and anti-tank guns soon as this experiment really turned out good for me. I got three platoons of strelkovy to field including a command for more than half of the prize I would have paid with Battlefront.
Also PSC provides much more information on e.g. painting the miniatures which safes a lot of time on your own research. We want to play Battlefront and not to research on what to paint !
Clear winner by points: Plastic Soldier Company
Donnerstag, 22. November 2012
Flames of War - (Painting) - Russians and SS-Mortar Platoon (Part 3) achiving Great Standard
To achive a greater standard then the gaming one take a look at the uniforms provided like in Osprey books or similar.
Simply start with boots , gear etc.. to give them some colours as you see fit from your research:


Simply start with boots , gear etc.. to give them some colours as you see fit from your research:


Montag, 19. November 2012
Flames of War - (Painting) - Russians and SS-Mortar Platoon (Part 2) achiving Game Standard
Finally the next step.
Everything dried over night and so it is time to go ahead and put along some washes on the miniatures and the gun.
Afterwards I let them dry a couple of hours and then go ahead with the same colours used in the first instance. This time I put some white into them and left out the water.
I then drybrush over the areas which are easy to access and leave the others as they are. This gives them some depth.
Last part is to use my favourite colour for flesh, paint the weapons with gunmetal grey and tadaaaaaa we are finished with the models on a gaming standard.


If you want them more to have a look at and not for playing.. or simply are as stubborn as I am .. then you should go ahead for some more details including the gear.
Sonntag, 18. November 2012
Flames of War - (Painting) - Russians and SS-Mortar Platoon (Part 1)
After yesterdays posting about my new guns it is time to come along with the painting stuff.
For that reason I took the
Russian Battalion HQ
Russian Company HQ
85mm obr 1939 gun (late)
as well as for the german side SS-Mortar Platoon
During the night everything dried and it is time to take some watered down Vallejo Kaki to give the russian guys some sort of basecoat with it. As Kaki will be the most common used paint here for the uniform this was the easiest way to achive.
The gun on the 85mm obr 1939 got a simple green by Citadel GW colors.
For the germans it is the simple grey of the uniform mixed a bit with a dark green. Both colours mixed and also watered down.


Flames of War - (Miniatures) - New guns for the masses
After my break for one week in Germany it is finally time to present my new ammo for my troops.
As this months topic is still about painting (yes I did not forget about that) it is time to do so on more figures instead of tanks and more theoretical painting topics.
What did I bring along ?
First of all we have the outstanding :


As this months topic is still about painting (yes I did not forget about that) it is time to do so on more figures instead of tanks and more theoretical painting topics.
What did I bring along ?
First of all we have the outstanding :
Tank Destroyer Security Section (2x M20 Utility Cars + Jeep) US3
Directly followed up by :SS-Mortar Platoon (6 Mortars) [GE815]
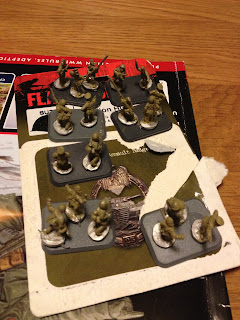
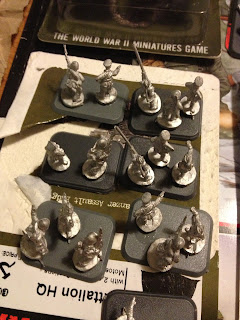
And some new deployed Russians including:
85mm obr 1939 gun (late) [SU543]
Battalion HQ (SU700)
Company HQ (SU701)
If you do not know how they look like see the already base glued miniatures here:


Samstag, 17. November 2012
Flames of War - Painting Guide - German SS
After the early wars I guess it is time to go to the most infamous army part of germanys army in WW2.
There are a couple of examples in all kinda books on how to present these as miniatures. I still recommend the sets by Flames of War for painting:


There are a couple of examples in all kinda books on how to present these as miniatures. I still recommend the sets by Flames of War for painting:


Donnerstag, 15. November 2012
Flames of War - Painting Guide - German Infantry (early war)
Sometimes I really like the battlefront webpage. Especially when they provide the useful stuff for you.
The Flames of War website provides at current state plenty of opportunities to find the correct painting guide for your army as well as the colours used.
I think it is quite important and makes your job easier if you really think about buying the boxes for each of your troops... like all colours for the germans, british and so on. At least you will get quite some colours and on the other hand have the correct colours at hand if that is important to you instead of some substitude colours (which also may suite you). Here we have the painting guide for German Infantry (Early war):

Montag, 12. November 2012
Flames of War - (Tutorial) - FlakNest aka "Bunkergate 7" (Part 3)
Hi all !
We are nearing the end of this tutorial. After all glue and filler finally dried it is time for the basecoat. Please note that spray basecoat or primer doesnt work on styrodur. It will burn and dissolve it and so never ever get the idea on doing so... except you like some strange looking outcomings.
With that it is time for some acrylic black paint as a basecoat. Thank god, there was that special offer at our local "Arts and Hobby" shop with 3 colors for 10 Euros which actually is quite cheap. Considering that it is a colour by a company called "Winsor & Newton" and that you get 60ml per tube. Nice.
As you also could see I glued in some real stones so real paintbrushing also is excluded and also would not fill the glued upper parts of the FlaKNest/Bunker.
What you need to do here is just make a dipping with your brush. Means you take up the colour with it and then dip it on the places till everything is coloured. That takes a while but gives a good coverage and not some smears around.
Tomorrow we will be going to paint the rest and do some other works on that.
Happy building


Flames of War - (Tutorial) - FlakNest aka "Bunkergate 7" (Part 2)
Again a multipart tutorial... that leaves me at least less pressure on writing. Really looking forward to the thursday gaming round and the rangers program.
Over night everything went dry and I added some "wood planks" for "security" and concealment reasons to the diorama. Still the scene seems quite peaceful.
As I do not want to build around like stairs leading up we will assume that accessing the top of this bunker/flaknest you will need to go from the inside. That also makes sense if it comes to protection of the soldiers there in wait.
As you might recall I painted and glued a plastic tank by PSC lately I still have some things left from that sprue which I will use up here. This also includes an opening for a tank vehicle. Perfect match here.
The second thing I will do today is to put in some filler. Reason is to give this bunker a more nature enclosed feeling instead of being an easy target from above.


Sonntag, 11. November 2012
Flames of War - (Tutorial) - FlakNest aka "Bunkergate 7" (Part 4)
Hi again,
after all the basecoating it is finally time for finishing the bunker/nest....
What did I need?
- Vallejo US Field Drab
- Citadel GW Calthan Brown
- Wabco Light Grey
- Wabco Fieldgrey
- Vallejo Gunmetal grey
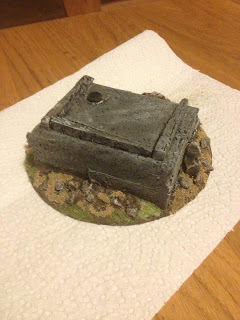
First I started heavily drybrushing the base around the bunker with first US field Drap, then a light drybrush with light grey and aftwards a light drybrush with Calthan Brown. From there just go straight ahead to use a deep inked black wash on that field to repeat with a light drybrush of calthan brown and light grey.
The bunker as it is from the complex is first heavily drybrushed with fieldgrey and then light drybrushed with the light grey. Wood pices get a mix of 50-50 calthan brown to US field drab. The opening from the Tank turret gehts only a basecolour of Gunmetal Grey
The usual sand and flock stuff around and your result should look like this.
Happy building everyone !


after all the basecoating it is finally time for finishing the bunker/nest....
What did I need?
- Vallejo US Field Drab
- Citadel GW Calthan Brown
- Wabco Light Grey
- Wabco Fieldgrey
- Vallejo Gunmetal grey
First I started heavily drybrushing the base around the bunker with first US field Drap, then a light drybrush with light grey and aftwards a light drybrush with Calthan Brown. From there just go straight ahead to use a deep inked black wash on that field to repeat with a light drybrush of calthan brown and light grey.
The bunker as it is from the complex is first heavily drybrushed with fieldgrey and then light drybrushed with the light grey. Wood pices get a mix of 50-50 calthan brown to US field drab. The opening from the Tank turret gehts only a basecolour of Gunmetal Grey
The usual sand and flock stuff around and your result should look like this.
Happy building everyone !


Abonnieren
Posts (Atom)